Introduction

A major part of the stitching process during leather working is punching stitch holes into leather. Usually done with a fork punch and mallet, it can be really loud especially for my neighbours as I lives in an apartment building. Hence I always found this part of the process a hassle as I would have to bring my whole setup downstairs when hammering so that I would not disturb them.
This project is a solution for that. I felt that it could be possible to combine a arbor press with a leather fork punch to allow for easy, precise and quieter holepunching in a nice and cheap DIY 3D printed package. Given the strength of such plastic components, I thought at first that it would be more realistic to modify an existing arbor press to fit a fork punch but the size (>$100!) and cost of a regular metal one was a huge turn off. So I thought that it would make for a fun and good challenge as well as an experiment in pushing the strength of 3D printed plastic.
Pressly is very durable and versatile, being able to punch >4 layers of leather with relative ease. Different leather forks can be swapped out easily by undoing a retaining M4 screw. Operation is similar to a drill press and allows for precise application of force such that you can pre-mark dents in the leather before committing to a hole punch.

Mechanism

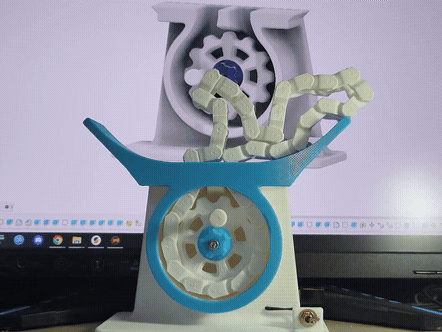
Pressly’s mechanism is very simple, consisting of a rack and pinion assembly using a herringbone gear profile. This is to maximise the contact area and shear strength of the print as they are the most critical parts in ensuring smooth operation. The rack holding the punching fork is also kept as close as possible to the main body for strength.
Print Settings + Assembly
- Rack, Pinion, Gear and Arm Attachment to be printed at >4 Walls >50% Infill with preferably PETG
- Axle to be printed at >4 Walls 100% infill with preferably PETG vertically up on the bed
- Everything else ( Main body A & B , baseplate ) can be printed with more conservative settings 3 Walls, 20% Infill
- For the Arm Im using a long Phillips screwdriver with 6mm diameter cause it has a nice handle but you could just use a steel rod/3D printed rod.
Additional parts needed:
- 15x M3 Heat Set Inserts
- 1x M4 Heat Set Inserts
- 10x M3x10mm screws
- 5x M3x20mm screws
- 6x M3x30mm screws
- 1x M4x10mm screw

Heat Set every screw hole in the assembly.

I did test if only plastic for these parts were sufficient but they seemed to start cracking on repeated hole punches at 3 or more layers of leather. For additional strength, you can drive the 6x M3x30mm screws straight into the gears to reinforce it.
I also added some cloth tape where the rack meets the mainbody while sliding up and down for a tighter friction fit but thats up to user preference. Surprisingly, the axle holds up despite the large forces applied as most of the force is transfered through the Arm attachment into the Main body.
There are 4 holes around the baseplate if you ever want to fix it to a table or swap in baseplate surfaces. Full .f3d and .3mf files are provided in the Printables link at the top.